Update 16th June 2004
If you wish to view previous work then links to updates are above. Work before this date was organised in sections (chassis, engine, bodywork etc.) you can see this work by going to "New Project Title Page" above.
The car is now finished and I have been enjoying driving it. I have done a few competitive hill climbs and sprints, driving it to each event. Where ever the car goes it creates a great reaction. Everybody seems to love it, I am amazed that it is so well recieved. Many people have also come up to me saying they feel as if they are part of the car as they have followed the build up on the website, it is nice to meet you all.
The car has been photographed for a couple of magazines. Due out in early
July 2004 is Retro
Cars Magazine with a large feature on the car. Hundreds of pictures
were taken so the article should be very special. Allan Staniforth has also
done an article which will hopefully soon appear in Race Car Engineering.
This article should really help me get work.
Even though the car is finished I plan quite a few more updates to the site,
I will do an analysis of the car, (saying what I like, what I would do different,
what I want to change etc,) how I set the suspension up, lots of pictures
of the finished car and reports of events I do. I also hope to get some
video clips of the car for you to download.

The windscreen is bonded in using black silicon sealant. The glass had
a chamfer / bevel
ground along the edge which the silicon fills leaving a neat edge. I also
sprayed the inside
of the glass around the edge with matt black. This was done at 0530 hrs
one morning!
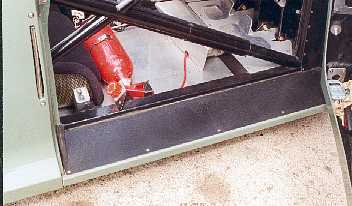
The sill and finisher are all made from aluminium. The green finisher
is aluminium bent
90 degrees and the black panel fills the gap between the finisher and
the chassis.
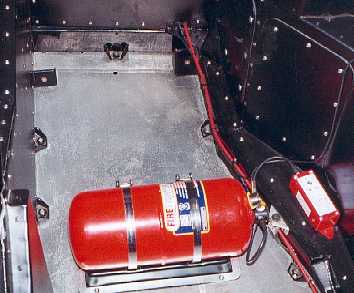
I have two fire extinguishers in the car. This is the plumbed in one. It is
electrically
operated and discharges via two nozzles under the bonnet. One goes onto the
injection
the other the oil system by the exhaust. This is not required for the competition
I
do but I fitted it for my own peace of mind.

The extinguisher is discharged by pressing the button by the gearstick (once
it is armed).
The red "T" pull kills the electrics.
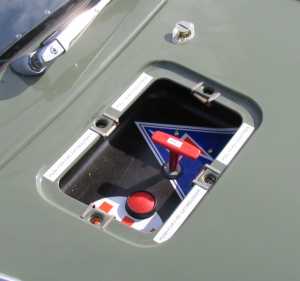
A cut out in the bonnet (with clip on cover) reveals the external button for
the fire
extinguisher and electrical "T" pull cut off.

To adjust the hieght of the door windows I made these little adjusters.
Bonded onto each door is little ledges. I push in the knob and a pin sits
on the ledge keeping the window up. Pull the knob and the pin comes off the
ledge
enabling the window to drop.

Beacause my seat belt attachments are so close to the seat I had the belts
modifiied so they are non adjustable. This saves wieght. The company I
bought the belts from did this modification and charged me lots of money.

This is the floor under the sump. It is quite close to the sump so I put soft
foam
onto the floor. This stops stones, grit etc getting between the floor and
sump and
wearing a hole in the sump. The square well is to clear the gearbox. This
now
also has foam in it.

This shows the padding under the "dash" for my shins. It is roll
cage padding
with camping matt under it.

This is my home made bumpsteer gauge. The board is clamped to the
hub and as the suspension moves up and down I can see a gap appear
between a roller and the board.
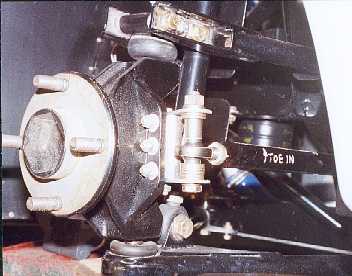
I adjust the bumpsteer by altering the steering arm hieght. I used washers
to give me a quick easy way of adjusting. I then turned up spacers to suit.
I adjusted so that bump steer was to a minimum. While I was on I also tried
altering the toe setting from 1mm toe in to 1mm toe out. This did not effect
the bump steer.

This shows cheap versus expensive for doing the corner wieghts.
I made a balance beam. This has 2 pads for the wheels to sit on
and a central pivot. The rear wheels sit on level pads and the front
adjusted until the beam is level.
I then had the chance to borrow digital corner wieght scales. My method was
as accurate as the digital scales within the limits of rpeatability.
However I then read that the way to set corner wieghts is to make each side
of the car
have the same front rear distribution. So in my case the left side has a front
/ back
ratio of 47.5 / 52.5 and also the right side has the same ratio. This does
mean that
each wheel carries different wieght and my balance beam will not work.

The scales set up. Levelling the scales is very important. If for example
the vehicle has a wheel rate of 300lb/inch then if the scales are 1/10th inch
out of level then there is already a 30lb error.

This is levelling the rear wheel pads for my balance beam set up.
What ever method I used I tried to get repeatability with my results.

To transport the car to the hood trimmers (15 miles away) I made a temporary
hood out of
plastic sheet and taped it on the car.

Another view of the hood.

I was very impressed with the standard of the hood. The fit
is very good. Unfortunately some
of the trimming work on the car is not quite so good.

I love the shape of the hood.

I also had a hood bag stitched up. When the hood is down it sits quite low
on the body,
unlike many hoods which sit high. I am very happy how it looks. However the
hood bag
is different side to side.